Continuous integration
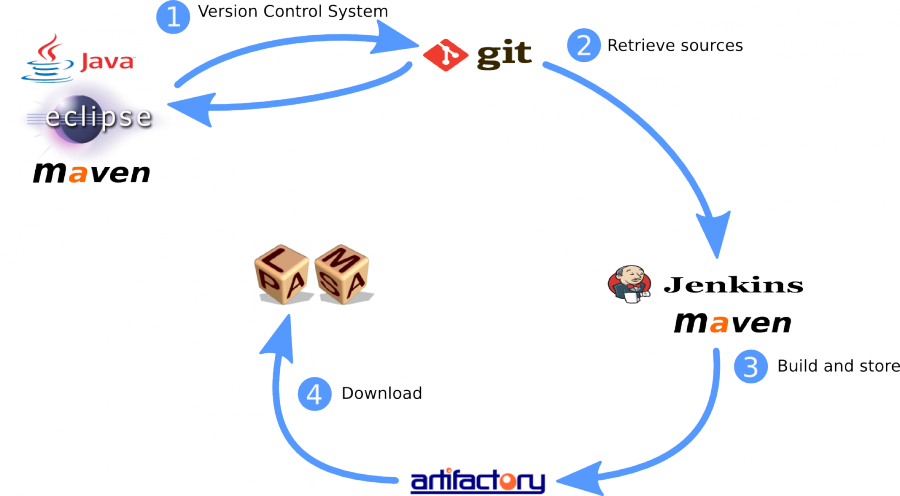
The PLASMA Lab project use Continuous Integration practice. After an an overview on this practice and the tool chain we use, this chapter details the procedure for publishing a new version of PLASMA Lab.

Git
Git is our Version Control System. The Git repository is hosted on gforge.inria.fr and a link to the PLASMA Lab Git can be retrieved by joining the PLASMA Lab Gforge project.
Maven
Maven handles project dependencies and build configuration.
Jenkins
Jenkins is an Automated Continuous Integration server. The server is hosted at ci.inria.fr. Jenkins is used to launch automated SNAPSHOT build every night as well as manual release build. Executables are the deployed to Artifactory.
Artifactory
Artifactory is an open-source repository manager. Build are stored on it and can be downloaded by PLASMA Lab users. Artifactory is also hosted by INRIA.
New Release Procedure
The deployment procedure is made of two main steps. The first one is to release and build a new version. The second step consist in updating and publishing each medium we use to distribute PLASMA Lab. These medium are the bundles installation files -.zip and .tar.gz-, Java Web Start -.jnlp files- and also the PLASMA2Simulink App for MATLAB.
We will details these steps in the following sections.
New version release
The first step of a new release is to change the version number of each pom.xml file to a release version number. As a reminder, even number are release version, odd version numbers are snapshot and are completed by the -SNAPSHOT mention. This can be easily achieved with the replace function of Eclipse.
We then commit and push to the git repository. Once this is done, we launch a manual build on Jenkins. This will build the release and publish the resulting jar files to Artifactory.
At this point, the new release has been published. We can update the version number to the snapshot version and commit or wait until the end of the deployment, in case of a last minute bugfix.
Bundle update
Bundles are archive files -.zip and .tar.gz- that contains pre-configured PLASMA Lab with basic plugins and a few examples. A user needs only to extract the archive to start using PLASMA Lab. We update these bundles by replacing jar files with newer version.
Previous bundles should be found in the plasma_lab_deploy/bundles directory located in the git repository or could be downloaded on the PLASMA Lab website. We make a copy of the latest version and update it.
Latest version of the jar files were uploaded to the artifactory repository during the release step. We download the required files and replace the older files in the bundle directory. We can also update readme and configuration files, at least with the latest version number.
Finally the PLASMA_Lab-VERSION directory is compressed into archives. We will updload these files during the latest deployment step.
JNLP update
Java Web Start allows users to launch a Java application just by clicking on a link to a jnlp file. The jnlp file contains information about the program the should be executed.
We need to update our jnlp files with location of the latest version of PLASMA Lab. The PLASMA Lab jnlp file refers to the jar file in the Artifactory repository. Thus we only need to update version numbers. These jnlp files are located in the plasma_lab_jnlp directory in the git repository.
There are two sets of jnlp file, a release version, using the latest PLASMA Lab release, and a snapshot release using the latest SNAPSHOT build. Each set contains PLASMALab.jnlp, PLASMAService.jnlp and configuration file. We need to update version number in each of these files.
We will upload the jnlp files during the latest deployment step.
PLASMA2Simulink update
PLASMA Lab is also available as a MATLAB/Simulink App. This project source files are located in the plasma_lab_2_simulink directory in the git repository
We download the latest version of the fr.inria.plasmalab.matlab_ui project to the plasma_lab_2_simulink directory, replacing the older one. Then we update reference the matlab_ui jar file in the plasma2simulink.m file. This is the app source code.
Finally we build the app using the app tool in MATLAB. It is launched from MATLAB by opening the PLASMA2Simulink.prj. We replace the include of the previous matlab_ui jar file by the new one and build the project. This operation produce a PLASMA2Simulink.mlappinstall file which is the installer for PLASMA Lab in MATLAB. The user just has to open it with MATLAB to install PLASMA Lab as an MATLAB App.
Deployment
The plasma_lab_deploy contains the deploy.sh script. This script take a version number as a parameter and publish latest distribution file to plasma-lab.gforge ftp repository.
The latest step of the deployment procedure is to update all download links in the PLASMA Lab web site.